Could I Achieve Pro Quality Videos With A $400 Budget?
What was the inspiration behind this blog post?
This email comment in response to my recent webinar…
‘…I am a stickler for professional looking presentation and yours looks amazing, but alas I can't afford the camera at this time, so will have to put that on hold for now... I’ll add what I can to my Christmas list and hopefully we can connect in the new year sometime.’
I’ve had similar comments recently and I fully appreciate that the equipment isn’t cheap so I’ve been digging deep to find a cheaper solution that won’t loose too much of the quality.
Being totally honest, I’ve spent all afternoon in a coffee shop working on this blog post as I just didn’t like where it was heading. I looked on eBay at second hand versions of the Panasonic cameras I recommend and there really wasn’t much more than $80 to be saved off the cost of a new one. I guess they’re still pretty new and have a great reputation but I couldn’t hand-on-heart recommend that as a solution.
I came away on one hand feeling satisfied that those Panasonic cameras really are a great deal but on the other hand frustrated that I hadn’t solved the problem of how to get started on a tight budget.
Now if we strip this back to basics, what we’re looking for to get started with our filming is the following:
- A camera and prime lens
- A tripod
- A mic
- Some lighting
Lets work down them one at a time…
Cameras
As you’ll probably know by now I don’t tend to present several options and leave you to scratch your head over which one to go for, that’s just frustrating. I do the research and decide which option I’d go for and present it to you. Hopefully you prefer that, I’m all about making life easy for you.
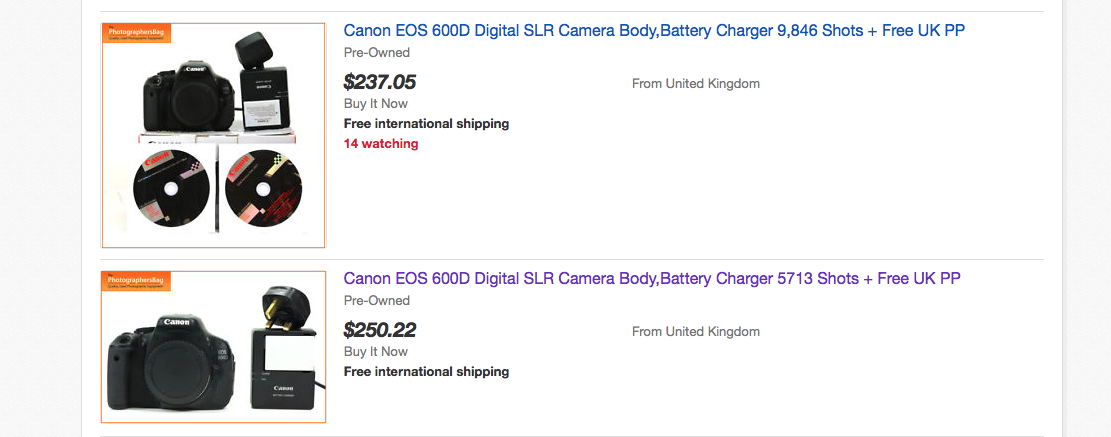
So with that in mind I thought about the idea of buying off eBay rather than going too cheap on new cameras and I reckon if I were on a tight budget but wanted decent result I’d get myself a second-hand Canon 600D (T3i) and a new Yongnuo 35mm prime lens.
Why this camera? Well it’s about the earliest in the Canon range that did decent video with a flip out screen and I’ve used one myself on several occasions and always been pleased with the results.
A quick search on eBay and I have found this model ‘body only’ as I am going to use a different lens for around $250!

Then I’m going to buy the Yongnuo 35mm prime lens for $90 (Amazon.com / Amazon.co.uk) which I’ve tested in my studio and am very happy with.
So I’ve got my camera all set up for less than $350. Not bad!
Now you are going to struggle if you’re working alone as the Canon app doesn’t work for filming, only stills. One solution is to have your computer near you and have the connector cable from the camera run to your computer and run the free EOS Utility program. I’ve done this for years with my Canon 5D and it works really well. If you want to know more pop me a question on the Facebook group. Other than that, you’ll have to pull in a member of the family to focus you up and hit record.
Ok, what’s next…
Tripods
This one’s easy to buy cheap. Simply go to Amazon and have a nose. I found this one for just $23!
As long as it will reach at least 1.5m high like this one it will do the job.
Obviously the more you pay the better the quality and the longer the life you’ll get but our goal here is to do this on a budget so no moaning when it comes!
Microphones
Ok, this hurts me as I love to get the sound as crisp and clear as possible but again, we’re on a budget and this is actually somewhere you can make a massive saving short term.
Don’t tell anyone I recommended this but grab yourself a wired lavaliere mic that will plug straight into your camera and you're away.
This one’s just… $16!
Now please don’t come back saying that it doesn’t sound like mine, it won’t and honestly I have a real dilemma here but go for it as this will actually come in hand in the future when you eventually get your panasonic camera and start doing LIVE broadcasting.
Moving swiftly on…
Lighting
Now this is probably the trickiest element for me as I never want you buying kit that you’ll end up shoving in the attic, that just seems such a waste.
If you have decent daylight in your room and can face towards a window why not trying that before spending out on any lights! Seriously, with the 1.8 aperture your Yongnuo lens will give you you just might cope.
What I don’t want you doing is spending $150+ on some soft boxes that really aren’t going to give you flattering light and feel like I’m wasting your money. Have a go with the natural light, record me a video and send it into the Facebook group and I’ll review it and give you some suggestions on improving it ;-)
So lighting has cost us…$0
Summary
Well you’ll still need a memory card if you don’t have one and possibly a few little extras but I reckon we’ve got ourselves a budget setup for around $380 and haven’t compromised too much on the quality. The video certainly will be fine, the audio acceptable and hopefully the lighting good enough to get yourself started.
Just don’t see this as a long-term solution and you’ll be fine.
As money starts to flow you can build your kit up depending on the greatest need. If you’re doing fine with your natural light then make the audio your first priority. If the sound is acceptable to you then maybe look at the lighting, or consider a CamFi to do your remote shooting.
Of course, I’m here if you need me and I hope you'd come back to me for advice moving forwards.
This wasn’t my favourite post as I’m a stickler for quality but I do live in the real world and if I can get you up and running for under $400 then Ie’ve done a good thing.
Please let me know if you’ve found this helpful and share it with anyone else you think would find it useful.
See you soon,
Adrian
Cover image credit - http://mollymoocrafts.com/diy-camera/
Stay up to date with new posts and updates!
Join our mailing list to receive the latest posts and updates from our blog.
Don't worry, your information will not be shared.
We hate SPAM. We will never sell your information, for any reason.
